On this page, in no particular order, I have highlighted some of the details on our Viking Fibreline caravan of which we are particularly proud. Some are new features I have not mentioned previously, and others are repeated from earlier pages in this blog.
The gas box was acquired and prepared as described on page 10, and was originally planned to be painted plain white; that is until I saw some of the work by Retro Custom Caravans in New Zealand which inspired this. Firstly, I used an offcut of the plastic chrome trim from the closet to see how much it would bend to create the 'V'. This curve was drawn on brown paper to create a template and mask for the paint. We sprayed the box with aerosol paints then applied the self adhesive plastic chrome trim.
Lou bought some bakelite speaker housings from an e-bayer in Germany. She polished them with Greygate No5 bakelite polish and wanted them functional and sited on the upper shelf at the front of the Viking. We took one to a local car stereo shop to see what speaker would fit, and came away with a pair of 10cm coaxial speakers. However, this set-up would result in the speakers operating in free air and affecting the way they sound. To solve this, I made a baffle for each and was able to install them using the original mounting attached to the chassis of the housing. I made a pair of small plywood bases to sit the housings at the correct height and angle in relation to the oak upstand around the shelf. The speakers are connected to a Nobsound NS-10G mini bluetooth amplifier that works perfectly with my i-Pod.
I mentioned the closet window sill on page 31, where we were searching for an appropriate plastic to cover the matt formica to give it a gloss appearance. Lou got some artists acetate sheet from an art shop and this does the job very well.
I also wrote on page 31 about a few tidying up jobs. One of these was to re-fit piping along all the edges where walls meet each other or the ceiling. We got white wing piping from COH Baines and used clear CT1 to stick it in place. The picture below shows the piping used around the access panel for wiring in the closet.
Lou wanted a shelf between the mirror and sink in the closet. As usual, we could not find a commercially available shelf of the size and style we wanted, so I made one. It is clear perspex held with chromed supports intended for glass shelves, fixed to the hollow wall with jack nuts. Obviously, it cannot support much weight but it is perfect for toothbrushes and contact lens paraphernalia.
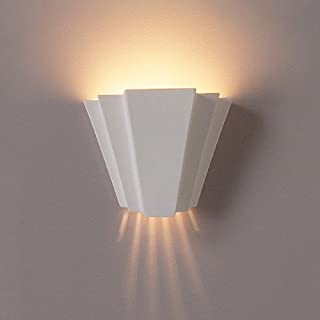
The light above the mirror in the closet is intentionally bright, but there are times when a more subdued light is appropriate, such as middle of the night toilet trips. On the opposite wall, Lou wanted a caravan-scale wall sconce, but in a colour scheme matching the 'stained glass' window. Again, we had to make it ourselves. We made several paper mock-ups to establish dimensions; I think the one pictured below is about the 4th version. Lou chose a selection of translucent coloured perspex sheets and, working from the dimensions of the paper model, I cut out the components then glued them together. The edges were covered in self adhesive lead strips giving the light shade a Tiffany style. Even the lowest rated LED I could find was still too bright, and painting the bulb gave the wrong lighting effect, so the central purple panel is double thickness and this has toned it down nicely. The rays of light projected onto the wall are created by a piece of soffit vent in the base of the shade. The light is operated from the second toggle switch just inside the door.
 |
| Our inspiration |
 |
| Paper mock-up |
 |
| Components cut & ready for assembly |
 |
| Glued together |
 |
| The finished article |
 |
| Bulb holder |
 |
| Light fitted to wall |
 |
| Light patterns |
 |
| Switches |
The toilet window was designed and executed entirely by Lou, and what a fantastic job she did! From polishing the frame to painting the glass. It is a sight all following motorists are treated to. Its colours are projected onto the inside walls when the sun shines through.
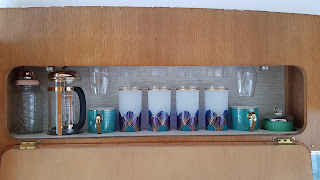
We use the upper locker nearest the door for glasses and mugs etc. In order to prevent damage to these items whilst the caravan is being towed, I designed a raised base with holes to sit them in so they cannot slide around. While Lou wallpapered the back of the cupboard, I set out the location of each item and marked the position and size of each hole. I used an adjustable hole cutter on a drill to cut them out. The board was then fitted inside the cupboard, sitting on blocks to raise it. The mugs etc. go through the holes and sit on the original base of the cupboard. I had some LED tape left over, and wiring had already been installed for a separate project that we abandoned, so the LEDs were connected and fitted beneath the false base. Their light is projected up through the glassware. The cocktail shaker (essential caravanning equipment!) is top heavy so needed extra support; I fitted a leather strap (like on a picnic hamper) to hold it in place. Stemmed glasses are suspended from terry clips above.
 |
| Wallpaper inside cupboard |
 |
| Setting out the location of holes |
 |
| Cutting the holes |
 |
| Safely stowed |
Most of the items we have bought for this project have been sourced via e-bay, and one of our luckiest finds was the set of four new old stock chrome vents. These have been fitted to the upper ventilation holes on our Viking, and they certainly look nicer than the original white plastic vents.
The original grab handles on the Viking were in a very poor condition and were also (in my opinion) ugly, resembling rather agricultural toilet roll holders. In our search for a suitable alternative, Lou found these marine-grade stainless steel cleats which I think look so much nicer and do the job just as well.
The wheels have been powder coated and, influenced by my interest in hotrods, white wall flaps were installed with the tyres. I am still working on an invisible way of making the new hubcaps stay on!
Our Viking Fibreline is surrounded by more than its fair share of aluminium trim, and then there are the window frames. Lou polished each and every one of these to a mirror finish. Some of the trims were in such poor condition it is difficult to believe they're the original pieces. Contrary to popular advice posted on social media and forums, the aluminium has not tarnished due to the removal of the anodising. At the time of writing, our trims have been on the caravan, parked outside, for almost four years and, apart from a quick once-over with Autosol last year, they still look as good as new.
I still cannot believe Lou managed to source a kitchen worktop that matches the exterior paint. At the time, I couldn't even find 'off the shelf' paint in that colour! I am really pleased with the way the worktop turned out, and the new aluminium back I made, filling the gap between the worktop and window sill.
Lou bought the vacant/engaged lock from a stall at a vintage event, then polished it. It just looks so right on the toilet door.
I designed and built the utensil drawer from scratch. It provides a purpose for an otherwise wasted space and neatly stores the larger cooking utensils. The drawer runner includes a hold-in feature so the drawer stays closed, even when the caravan is in motion.
Lou designed and created the curtains, with help from my daughter, Hannah, who produced the graphic. Lou had a concept idea of dancers with musical staves swirling round them. Hannah took Lou's graphic and altered the colours, varied the direction they face, and added the staves. She also grouped them to optimise the pattern repeat and then sharpened them up pixel by pixel so they would print crisply. As a final touch, she added the musical notes which are the opening bars to 'Sentimental Journey'. Once the material was printed, Lou cut out and sewed the curtains, using a pair of second hand curtains in a similar colour as the lining. With leftover material from the seat upholstery, Lou made curtain tie-backs. We also had a pair of black-out roller blinds printed to match, and these hang in the kitchen and closet windows.
During her search for a company to print the curtain material, Lou discovered one that would print lino. She thought it would be a good idea for the closet floor. Our chosen image was e-mailed to the printer and they posted back our printed lino. We then cut it to fit the closet, choosing not to centralise the swirl, but to place it where the pattern would be most visible between the toilet and cupboards.


