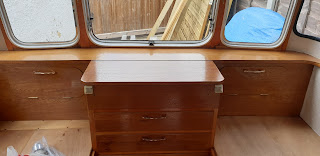
Moving on to the living area of the caravan, there are a few items I haven't covered previously, so I will include them here. First is the shelf that runs round the inside. It was originally covered top and bottom in spongy vinyl. Some of this covering was damaged by damp and mould, and all of it was dirty. We could not find a similar product to replace it, but Lou came up with the idea of using vinyl flooring. However, she wanted it in white, which turned out to be difficult to locate; after all, who would use white lino on their floor? Eventually, Lou managed to find a supplier and we bought a couple of metres. We cut the vinyl slightly wider than the shelf and glued it on with PVA glue, then trimmed the edges with a sharp craft knife. We also relined the shelves in the cupboard by the door, and the bases of the upper lockers with the new white lino.

 |
| Underneath front shelf |
Secondly, along the bottom of the bed bases was a strip of wood that had been painted black. This is narrow and inset, and would be difficult to sand the black paint off, so strips of oak faced ply from the second-hand doors were cut, varnished and glued in place.
 |
| Before |
 |
| After |
Last on the 'catch up' list are the handles on the cupboards and drawers. Originally, they were painted white but as you can imagine, they were pretty grubby after 50 years. Lou was going to re-paint them until she discovered the handles were shiny underneath, so chose to just remove the paint. The handles were soaked in hot, soapy water to soften the paint, and after a short while, the paint just peeled off. Yes, it really was that simple! If only everything was as easy. We re-used all our handles but by the end of our project, we needed some more. Having failed to find any through our usual source, Lou put a call out on a Viking Fibreline Facebook group and another member sold us his spares.


Another area we thought could be better utilised was the top of the wardrobe. This was to be boxed in and made into a cupboard too. More oak faced ply was used for the side; no mean feat considering the curved profile of the roof. Lou's idea for the door was to create a false radio. She found an oak fireguard with a sunray pattern on e-bay, and I cut this down to fit the space and Lou varnished it. Lou bought some radio speaker cloth from America, and using paper templates, cut the cloth to fit within the sunrays and glued them in with PVA. We wanted the door to hinge on the left, in the same way as the wardrobe door does, but it would collide with the ceiling light, so it had to open upwards. I used kitchen cupboard hinges as they would not be visible from outside, and for the way they work (in that they swing the door away before lifting it). We needed the door to be held up when open but two sprung hinges were too powerful, so only one hinge is sprung. Finally, as this was designed to look like a speaker, we didn't want a handle on the door, so I fitted a 'push to open, push to close' catch.


