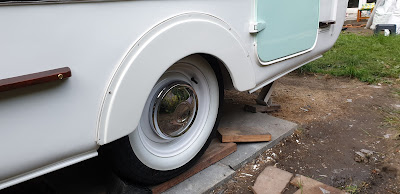
April and May 2019 were therefore very busy months, with us madly trying to get everything done. The wheels went to be shot-blasted and powder coated in Traffic White, then new tyres and white wall flaps fitted. Lou bought new hubcaps rather than polish the originals, which are pitted. Sadly, the new ones did not fit so our originals have gone back on for the time being.
 |
| Two Viking wheels, and one from a Bedford CA |
 |
New tyres & white wall flaps
|
 |
| New & old hubcaps |
 |
Difference in thickness of old & new hubcaps
|
We finally got round to dealing with the skylight. Lou sanded the inner surround, and I then sprayed it with the same aerosol paint as the inside of the door. I fitted this, with the Labcraft light mentioned on page 17, and a Fiamma Rollo blind cassette. We decided to use the opening mechanism from the new Fiamma skylight, so these sections were cut from the Fiamma surround to be screwed into ours. Whilst working on this, I knocked the skylight cover off the roof and broke it. Grrrr! More work! Araldite to the rescue. We needed to include a seal to go between the skylight cover and the "turret" on the roof. My first attempt with EPDM D section was a failure as it was too thick. I next tried a flat strip of rubber, which fits better, but struggled to find a suitable adhesive. CT1, PVA, Araldite and Sikaflex all failed to adhere to the rubber, but we ran out of time so the Sikaflex, being the latest attempt, was left lightly holding the rubber and the skylight cover was installed.


There are ten long aluminium trims on the outside of our Viking. Lou had polished most of these but one still needed final buffing, and the last one hadn't previously been touched, and was the worst. This one trim took Lou five evenings and a whole weekend to clean and polish. It was then fitted and its Herzim strip added.
The original grab handles were in poor condition, having severely pitted brackets and rusted tube in between. Not only that, but I think they look like toilet roll holders. I failed to find a good looking alternative from another caravan so extended my search along other avenues.
I was considering handrail brackets from marine applications so Lou popped into a ship's chandlers', and found large stainless steel cleats. Perfect! We cut gaskets from a sheet of rubber, to go between the cleats and the caravan, to provide a seal and to protect the paint.
 |
| Metal bracing behind grab handles. |
I wasn't convinced the timber frame within the caravan was up to the forces applied to these handles when manoeuvring, so I added metal plates inside to provide extra rigidity.

We didn't have time to polish the original Viking badge, but a spare had been fitted inside our caravan, so we used that. Again, a rubber gasket was cut and fitted behind the badge.
The wood rubbing strips on the sides received several coats of yacht varnish and were fitted with new brass screws and cup washers, apart from the rear offside strip which had been re-made from teak. This needs to be shaped where it conflicts with the electricity hook-up inlet, and then stained to match the originals, before varnishing. As the screw holes in the body were filled, this can wait.
Lou had a vision of how the toilet window should appear. She wanted a stained glass effect sunburst pattern, made with self adhesive lead strips, and then painted with translucent glass paint; yellow for the sun and alternating green and purple for the rays. Our first attempts at marking the pattern didn't look good, so Lou found an image on the internet and enlarged it on a photocopier. The window was then placed over the resultant template and the lead strips stuck on the inside glass. Getting brush-on glass paint to look like stained glass is very difficult. Fortunately, Lou is both a talented artist and tenacious. Several times she had to remove a whole panel of paint with white spirit due to brush lines or some other defect, but she achieved her dream in the end. Further lead strip was applied on the outside surface of the glass.


New white window capping was fitted to all window apertures.

The five opening windows were attached with new stainless steel screws and Sikaflex sealing between the body and the hinge. The metal brackets for the stays were soaked in spirit vinegar and scrubbed to remove rust, then sprayed white.
New anti-rattle catches were fitted to the window surround, and their metal brackets were also sprayed white. The rubber seal, being new, will take a while to squash and its thickness at the top prevents the window from closing at the bottom, so it was very difficult to get a complete seal around the windows. The clips for the stays had to be mounted further inboard than original in order to pull the window in tighter.
The two front fixed windows had Sikaflex applied around them, and were then screwed to the caravan.
The aluminium door frame received its fair share of Sikaflex and stainless steel screws, along with the curved part at the bottom of the door aperture. The tread plate had seen better days so a new one was made from checkerplate aluminium.
Unfortunately, when I held the two parts of the door in the doorway, it didn't fit. Despite using the original mounting holes, the bottom part of the door surround was too high, meaning the aperture was no longer tall enough for the door. I found out how good Sikaflex is at this point, as it took two hours to remove the bottom section of door surround, and clean the sealant off. A great deal of making good was required as the aluminium surround was bent and its paint was damaged in this process. Also, we couldn't use our new checkerplate tread as it was too thick and prevented the door from fitting correctly, so the original was cleaned up and re-used.
I had been concerned about fitting the door, as it has no means of side to side or up and down adjustment. As mentioned on page 11, a new wood frame was installed so I had to drill new holes to screw the hinges on, and they had to be right first time. Adding to the pressure was that you cannot see the holes in the hinges when they are offered up to the body, because the closed hinge covers the screw heads. The solution lay with the aluminium shims fitted between the hinge and body. I put some Frog Tape across the shim and extended it out both sides, positioned the door in its aperture, and slid the shim between the hinge and body. Once lined up, the extended tape was stuck to the body, and with the door removed, the shim gave me a guide of where to drill. The removal of the lower surround and fitting the bare door took an entire day.
 |
| 8pm. Sun going down and door is on. |
An evening was spent fitting the weather caps above the windows. A bead of Sikaflex then stainless steel screws was all that was required.
New white piping was glued around the top edge of the wheel arch spats, and these were screwed into position. We also araldited some giant pop studs to the inside of the nearside spat. With the other part of the pop studs sewn to an off-cut of the awning roof, we had ourselves a neat wheel section for our awning draught skirt.
The exterior and interior door locks went on, as did a new door retaining catch....
...followed by the window and a new Furflex green door seal from Woollies Trim.
On Saturday the 18th of May 2019, two years and one month after encasing the Viking in our homemade polythene shelter, we had what we hoped was a roadworthy and weather tight caravan. The shelter was dismantled, the caravan was washed and we moved it from the lawn to the concrete hardstanding. The next day, we took it for a road test, which I am pleased to say it passed, as nothing broke or fell off. Upon returning home, we leak tested it by spraying the windows with a hose. We found four failing points so set about sealing them. One was caused by a nail head lifting the white window capping so Sikaflex sorted this out. The other three were corner windows. The join where the two ends of the rubber seal meet wasn't tight enough so clear CT1 was employed. This failed to cure one final leak so we got a bottle of Captain Tolley's Creeping Crack Cure. Success!
 |
| Dismantling the shelter |
 |
| Ready for road test |
Two weeks to go until we left for Normandy, and we had achieved our deadline. There was still much more to do before completion of the restoration, but at least we could go to France with the Viking.
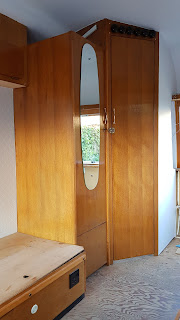
Our work didn't stop there though. We waterproofed the awning, fitted wardrobe and toilet doors, fitted the gas box, finished a few wiring jobs, vacuumed and washed the interior, cleaned the fridge, changed its door so it opened the other way, and fitted it. All this, and then there was the soft furnishings...
 |
| Waterproofing awning |
 |
| Internal doors |
 |
| The heart of the 12v electrics |
 |
| Clean |


 We didn't have time to polish the original Viking badge, but a spare had been fitted inside our caravan, so we used that. Again, a rubber gasket was cut and fitted behind the badge.
 We didn't have time to polish the original Viking badge, but a spare had been fitted inside our caravan, so we used that. Again, a rubber gasket was cut and fitted behind the badge.


