Then summer came and an unusually sunny one at that. Temperatures in the plastic shelter rose to well over 40°c and the aluminium was too hot to touch, let alone paint. It had also expanded in the heat, causing considerable warping along the sides where we had removed the screws and trim.
There were a couple of weeks when we just could not go in the shelter. This time was used to work on other areas. Lou polished the aluminium trims and window frames. They now have a mirror like finish, as well as all the old sealant removed from their back surfaces.
Initially, paint on the trims, caused by a previous owner's inability to colour within the lines, was removed with Nitromors.
Next, Lou used a drill mounted aluminium polishing kit purchased from Metal Polishing Supplies UK Ltd (https://www.metalpolishingsupplies.co.uk/ ), all ordered online with delivery in a couple of days. Use a sisal wheel first, coated with the brown compound. This cuts through the grime and oxidation. Then use a microfibre cloth and Vienna lime to wipe off the wax residue, and follow up with the colour stitch wheel and blue compound which polishes the aluminium. Another wipe with the cloth and chalk, then finish with a loose fold buffing wheel. A word of warning here; don’t do this in your living room like I did, as a shower of black wax sprays off the wheel onto everything. Also, make sure the wheel is spinning away from you or this muck sprays over your face too!
All the parts to be polished were screwed to scraps of wood to hold them steady in a workmate.
 |
| "Arrow head" trims |
 |
| screwed to wood for polishing |
 |
| Scrap wood cut to polish edges of arrow heads |
 |
| Polished |
The strip holding the draught excluder in the doorway required a frame around it to keep it still.


Lower end trim after Nitromors, before polishing.
After polishing. Yes, it's the same piece!
Old sealant cleaned off reverse.
 |
| Old sealant cleaned off window hinge |
Window frame

Partially polished with brown compound


Meanwhile, I renovated a gas box. A very generous gentleman in the West Country gave us a “bread bin” style gas box. This replaced the damaged and ugly one that was on the caravan when we bought it. All the fittings on our “new” gas box were removed and their mounting holes filled with body filler, then the outside sanded smooth. New marine grade, polished stainless steel hinges and a lock were bought and their new mounting holes were braced inside the box with stainless steel sheet to reinforce the elderly fibreglass. The inside was painted with white smooth Hammerite, whilst the outside was primed ready for paint.
 |
| As received |
 |
| Inside cleaned |

 |
| Box sanded & new hardware fitted |
Thinking ahead, we decided that before painting the caravan, we should cut holes in it for water and mains electric inlets. The original water inlet and outlet holes were filled, and a hole cut for a new Whale Watermaster inlet. The original holes were central but located behind the fridge, making internal access difficult, should it be needed. The new location puts the unit just inside the closet, near the kitchen wall. Internal access is now much easier, and the length of pipe to the taps in the kitchen and closet is kept to a minimum so the submersible pump doesn’t have to work unnecessarily hard.
 |
| Water in & out was 2 black circles below number plate |
 |
Holes filled
|
 |
| Drilling through template |
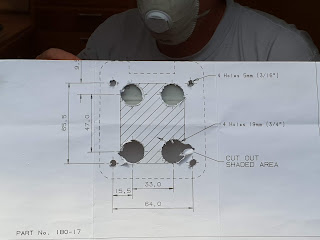 |
| Used template |


The electric hook-up inlet was originally under the caravan, necessitating lying on your back to locate the socket and plug in; not much fun if it’s dark, wet and muddy. The 240v electrics in the caravan do not conform to current regulations so they will be replaced.
The new inlet is now situated on the side of the caravan, entering the small cupboard below the wardrobe where the consumer unit will be located, thus keeping the length of cable unprotected by an RCD inside the 'van as short as possible.


The bottom of the "belly pan" is not visible (unless you lie underneath it) so doesn't need the same quality paint as the body. But we couldn't just leave it. The old paint was sanded off and we painted on smooth white Hammerite, and did this inside the wheel arches too.

Click here to go to the next page to continue reading our story.
 Next, Lou used a drill mounted aluminium polishing kit purchased from Metal Polishing Supplies UK Ltd (https://www.


